
Sunday, February 6, 2011


Tuesday, February 1, 2011
its all about blenders and wonders
http://www.blender.org/features-gallery/http://www.blender.org/features-gallery/
Tuesday, January 25, 2011
Free books to dowmload
http://congloi.info/visit.php?job=viewresult&sid=89360cd943b66ca2a060dc2de6af6376
rediffmail
hacking
http://tech.blorge.com/Structure:%20/2007/02/06/i-hacked-my-wireless-network/
rediffmail
hacking
http://tech.blorge.com/Structure:%20/2007/02/06/i-hacked-my-wireless-network/
Wednesday, January 19, 2011
COMPLETE FLEX
Top 5 Resource for Learning Flex
There are several locations that developers need to visit when starting out with Flex. Visit these to quickly get started:1. Flex.org - The single location for everything Flex. We are working on a major update the Flex.org site but this single page of links has a ton of value. Listings of the top blogs, urls for all Flex downloads, Links to Support, Lists and other goodness.
2. Flex Start Page in Flex Builder ( HELP > FLEX START PAGE )
This screen was designed to provide the basics for anyone getting started using Flex. It includes "How Flex Works", Samples, and Tutorials and Help. Here are the jewels:
a. Component Explorer - I still use this when I need a snippet of MXML for a specific component. It is handy and easy to use. You can see component working and the code that created then. Copy, Paste, Next!
b. Flex Style Explorer - There is now a link to the Flex Style Explorer. This app is invaluable for learning the details of skinning. Simply select the component you want to style, edit the properties and CSS is generated. Copy, Paste, Next!
3. Discussion Lists and Forums:
a. FlexCoders - This discussion list is the heart and soul of Flex. All the best developers frequent this list and many engineers are there. Joining FlexCoders is a rite of passage for anyone learning Flex. The list will flood your inbox so be ready, but when you have a question this is the first place to go. Search the archives of FlexCoders first, 99% of the time the answer has already been discussed.
b. FlexComponents - This discussion list is for developers writing components to extend Flex. The list was started after the component developer summit to kick start extending Flex with new components.
c. Adobe Support Forums - The forums are very handy for getting specifics on product details. There are categories for Flex Builder and Data Services so it is a bit more organized than FlexCoders or raw discussion lists. Many of the Flex engineers monitor and participate in these forums.
4. Flex Developer Center - There are fresh articles on Flex here and there are always new articles being posted to this section of the Adobe.com website.
5. Flex Cookbook - The Flex Cookbook is a place to get code and examples for Flex. The site is a mega-wiki to add articles and code from developers. It is a great resource and is growing very fast.
Java & Flex
http://learn.adobe.com/wiki/display/Flex/Flex+and+Java
great links ....:)
http://www.adobe.com/devnet-apps/flex/samples/flex4_sparkinc/spark_inc.html
example for flex
great links ....:)
http://www.adobe.com/devnet-apps/flex/samples/flex4_sparkinc/spark_inc.html
example for flex
Tuesday, January 18, 2011
JAVA -from where it came into our life
Java is a programming language and environment invented byJames_Gosling and others in 1994.
Java was originaly named Oak and was developed as a part of the Green project at the Sun Company.

जमेस gosling
Saturday, January 15, 2011
Friday, January 14, 2011
New page on 15th january 2011
DEGRAFA - GRAPH
When i was searching for a back ground graph for kbt application i got in to this site
http://jackherrington.com/node/10
http://jackherrington.com/home
TECHICAL BLOG
Adobe , today i dont know what to do , one new project is dr but ,...i need your support k
you know my situation na
http://coenraets.org/blog/android-samples/androidtutorial/
blog i got from adobe site it describes about the mobile and flex its nice to see the application...:)
Thursday, January 13, 2011
FLEX -STYLES
http://blogagic.com/50/the-blogagic-flex-explorer-collection
the most important pointer ,
http://examples.adobe.com/flex3/componentexplorer/explorer.html http://examples.adobe.com/flex3/componentexplorer/explorer.html
COMPONENT EXPLORER
http://examples.adobe.com/flex3/consulting/styleexplorer/Flex3StyleExplorer.html#
STYLE EXPLORER
http://www.wabysabi.com/flex/enhancedbuttonskin/
component button explorer
Tuesday, January 11, 2011
Integrating Flex with Oracle EPG (using XML)
Flex is a dynamic, open source framework that is being used extensively by developers to build, maintain and deploy web applications on various platforms including browsers, desktops and operating systems.
One major aspect of Flex is that it can be integrated with a number of languages including ColdFusion, Java, .Net and PHP to develop simple and complex web applications. While using other applications at the backend, it becomes more convenient with Flex to provide complex functionalities of web applications and database interactions. Also, Flex based web applications are dynamic and their interfaces are highly interactive.
A number of complex Rich Internet Applications are being developed using Oracle at the backend to serve as a database and Flex at the front-end. Most developers are using Oracle EPG (Oracle 10g) at the backend because it lets them have the data, security, business logic and application files in one centralized place, which reduces the complexities of maintenance. There are many other advantages of using Oracle with Flex to develop web applications. These are:
You will also be required to authorize the DAD to connect using a specific database user. Despite the fact that we provide a username - “DAD” – the default physically connects to anonymous.
As far as data handling in Flex is concerned, Flex does not communicate with the database directly. However, it can consume data from a web service like XML and display it. Flex uses the functions of HTTPService Class for data handling and storing in XML format, as well as communicating with the database web service. You can take advantage of the functions of HTTPService Class for handling the data after using XML services of Oracle.
HTTPService Class
When using HTTPService, the client makes an HTTPService request to the server. The server serializes the data into a XML string and returns that XML string to the client. The HTTPService then de-serializes the data from XML to objects. The client updates the data grid with new objects. Many functions of HTTPService Class are important for correct handling of data either from a URL or from the database. These are:
Send() -- To retrieve data from a URL and store it in the memory, the send() method of HTTPService object should be used. The send() method makes an HTTP request to the specified URL and an HTTP response is returned.
resultFormat-- HTTPService also adds the capability of handling XML data in different formats including “E4X” by setting the resultFormat attribute. To work with the loaded data as XML, it is required to set the resultFormat of the HTTPService object to “E4X”. This way the data retrieved from the URL will be stored as XML string and results could be accessed easily in XML format using the ECMAScript.
resultHandler() – The function is an event handler that is called when the call returns successfully.
To see a practical demonstration of Flex and Oracle EPG integration, I would recommend reading Mauricio Pacheco’s article, Flex Developer Center where he has very keenly described the connectivity of Flex with Oracle database using XML services.
References:
Mauricio Pacheco, “Using Oracle EPG to provide XML services for Flex applications,” retrieved Jan 23, 2009 from http://www.adobe.com/devnet/flex/articles/flex_epg.html
Tim, “DBMS_EPG - The Embedded PL/SQL Gateway in Oracle 10g Database Release 2,” retrieved Jan 23, 2009 from http://www.oracle-base.com/articles/10g/dbms_epg_10gR2.php
“Loading External Data with HTTPService,” retrieved Jan 23, 2009 from http://www.adobe.com/devnet/flex/quickstart/httpservice/
One major aspect of Flex is that it can be integrated with a number of languages including ColdFusion, Java, .Net and PHP to develop simple and complex web applications. While using other applications at the backend, it becomes more convenient with Flex to provide complex functionalities of web applications and database interactions. Also, Flex based web applications are dynamic and their interfaces are highly interactive.
A number of complex Rich Internet Applications are being developed using Oracle at the backend to serve as a database and Flex at the front-end. Most developers are using Oracle EPG (Oracle 10g) at the backend because it lets them have the data, security, business logic and application files in one centralized place, which reduces the complexities of maintenance. There are many other advantages of using Oracle with Flex to develop web applications. These are:
- Oracle EPG provides XML web services between the client and the server.
- The HTTP server can act as an embedded PL/SQL gateway to run PL/SQL applications via mod_plsql i.e. PL/SQL stored procedures can be invoked by the client using the embedded HTTP server. Mod_plsql is the Apache Extension module.
- In Oracle, the stored procedures that are coded in PL/SQL are executed using URL referencing.
- The administration of DADs (Database Access Descriptors) for the XML DB HTTP server is performed using the DBMS_EPG package, so there is no need to define the database instance.
- There is a file repository inside the database and can be accessed using HTTP, WebDAV or FRP protocols. The file repository hosts the XML contents directly. The repository has many file controls as well, including ACL (Access Control List), check-in/check-out, version control, programmatic access to files through Java or PL/SQL commands and file events.
- The advantage of having a file system within the database eases many complexities, such as accessing the file system lying in the operating system. Also, the deployment procedure is simplified because the need of the HTTP server is distinguished by having all of the files as part of the database.
| Begin -- Set the HTTP port of the XML DB HTTP listener to the standard, 80. dbms_xdb.sethttpport(80); -- Set the FTP port of the XML DB FTP server to the standard, 21. dbms_xdb.setftpport(21); -- This creates the DAD "DAD" and assigns it to the path "dd". dbms_epg.create_dad('DAD','/dd/*'); -- Assign the DAD to a database user. dbms_epg.set_dad_attribute('DAD','database-username','TEST_USER'); -- This unlocks the "anonymous" internal account so public access to the repository and static authentication is allowed. execute immediate 'alter user anonymous account unlock'; end; |
| Declare l_xml_config sys.xmltype; anonymous_already_set exception; pragma exception_init(anonymous_already_set,-30936); dbms_epg.authorize_dad('DAD','TEST_USER'); begin select insertchildxml(xdburitype('/xdbconfig.xml').getxml(),'/xdbconfig/sysconfig/protocolconfig/httpconfig','allow-repository-anonymous-access', xmltype('<allow-repository-anonymous-access xmlns="http://xmlns.oracle.com/xdb/xdbconfig.xsd">true</allow-repository-anonymous-access>'), 'xmlns="http://xmlns.oracle.com/xdb/xdbconfig.xsd"') into l_xml_config from dual; dbms_xdb.cfg_update(l_xml_config); commit; exception when anonymous_already_set then null; end; |
HTTPService Class
When using HTTPService, the client makes an HTTPService request to the server. The server serializes the data into a XML string and returns that XML string to the client. The HTTPService then de-serializes the data from XML to objects. The client updates the data grid with new objects. Many functions of HTTPService Class are important for correct handling of data either from a URL or from the database. These are:
Send() -- To retrieve data from a URL and store it in the memory, the send() method of HTTPService object should be used. The send() method makes an HTTP request to the specified URL and an HTTP response is returned.
resultFormat-- HTTPService also adds the capability of handling XML data in different formats including “E4X” by setting the resultFormat attribute. To work with the loaded data as XML, it is required to set the resultFormat of the HTTPService object to “E4X”. This way the data retrieved from the URL will be stored as XML string and results could be accessed easily in XML format using the ECMAScript.
resultHandler() – The function is an event handler that is called when the call returns successfully.
To see a practical demonstration of Flex and Oracle EPG integration, I would recommend reading Mauricio Pacheco’s article, Flex Developer Center where he has very keenly described the connectivity of Flex with Oracle database using XML services.
References:
Mauricio Pacheco, “Using Oracle EPG to provide XML services for Flex applications,” retrieved Jan 23, 2009 from http://www.adobe.com/devnet/flex/articles/flex_epg.html
Tim, “DBMS_EPG - The Embedded PL/SQL Gateway in Oracle 10g Database Release 2,” retrieved Jan 23, 2009 from http://www.oracle-base.com/articles/10g/dbms_epg_10gR2.php
“Loading External Data with HTTPService,” retrieved Jan 23, 2009 from http://www.adobe.com/devnet/flex/quickstart/httpservice/
An Introduction to Java Card Technology-Part 1
An Introduction to Java Card Technology -
| By C. Enrique Ortiz, May 29, 2003 |
Because these portable technologies are so specialized, this article covers a lot of ground. The first installment of this article will introduce smart cards, the Java Card technology, and the elements of a Java Card applet. The second installment will cover the development aspects of the Java Card technology.
Java Card technology adapts the Java platform for use on smart cards and other devices whose environments are highly specialized, and whose memory and processing constraints are typically more severe than those of J2ME devices.
Smart cards are very useful in the areas of personal security. They can be used to add authentication and secure access to information systems that require a high level of security. Information stored in smart cards is portable. With Java Card technology you can carry around valuable and sensitive personal information such as your medical history, credit card numbers, or electronic cash balances in a medium that is compact, yet very secure.
Smart cards aren't new. They were introduced in Europe two decades ago in the form of (not so smart) memory cards, used to store critical phone information with the purpose of reducing thefts from pay phones.
Smart-card technology is an industry standard defined and controlled by the Joint Technical Committee 1 (JTC1) of the International Standards Organization (ISO) and the International Electronic Committee (IEC). The series of international standards ISO/IEC 7816, introduced in 1987 with its latest update in 2003, defines various aspects of a smart card, including physical characteristics, physical contacts, electronic signals and transmission protocols, commands, security architecture, application identifiers, and common data elements.
A smart card is a plastic card that contains an embedded integrated circuit (IC). A smart card resembles a credit card. When used as a SIM card, the plastic card is small - just big enough to fit inside a cellphone. Smart cards are highly secure by design, and tampering with one results in the destruction of the information it contains.
In some areas of use smart cards are just memory cards that merely provide protected non-volatile storage. More advanced smart cards have both microprocessors and memory, for secure processing and storage, and can be used for security applications that use public-key or shared-key algorithms. The non-volatile memory in a smart card is its most precious resource and can be used to store secret keys and digital certificates. Some smart cards have separate cryptographic coprocessors that support such algorithms as RSA, AEC, and (3)DES.
Smart cards don't contain a battery, and become active only when connected with a card reader. When connected, after performing a reset sequence the card remains passive, waiting to receive a command request from a client (host) application.
Smart cards can be contact or contactless. As the names imply, contact smart cards work by communicating via physical contact between a card reader and the smart card's 8-pin contact, while contactless smart cards communicate by means of a radio frequency signal, with a typical range of less than 2 feet. The radio communication of contactless smart cards is based on technology similar to Radio Frequency ID (RFID) tags used in stores to counter theft and track inventory. Figure 1 depicts contact and contactless smart cards:
 |
| Figure 1a. Contact Smart Card |
 |
| Figure 1b. Contactless Smart Card |
 |
| Figure 2a. A Java-Powered Smart Button |
 |
| Figure 2b. A Java-Powered USB Token |
Years ago Sun Microsystems realized the potential of smart cards and similar resource-constrained devices, and defined a set of specifications for a subset of Java technology to create applications for them, Java Card applets. A device that supports these specifications is referred to as a Java Card platform. On a Java Card platform multiple applications from different vendors can coexist securely.
A typical Java Card device has an 8- or 16-bit CPU running at 3.7MHz, with 1K of RAM and more than 16K of non-volatile memory (EEPROM or flash). High-performance smart cards come with a separate processor and cryptographic chip and memory for encryption, and some come with a 32-bit CPU.
The Java Card technology specification, currently in version 2.2, consists of three parts:
- The Java Card Virtual Machine specification, which defines a subset of the Java programming language and a VM for smart cards
- The Java Card Runtime Environment specification, which further defines the runtime behavior for Java-based smart cards
- The Java Card API specification, which defines the core framework and extension Java packages and classes for smart-card applications
Let's compare the Java Card and J2ME platform technologies:
 |
| Figure 3. Java Card Technology and the J2ME Platform (click image to enlarge) |
A complete Java Card application consists of a back-end application and systems, a host (off-card) application, an interface device (card reader), and the on-card applet, user credentials, and supporting software. All these elements together compose a secure end-to-end application:
 |
| Figure 4. Architecture of a Java Card Application (click image to enlarge) |
The Back-End Application and Systems
Back-end applications provide services that support in-card Java applets. For example, a back-end application could provide connectivity to security systems that, together with in-card credentials, provide strong security. In an electronic payment system, the back-end application could provide access to credit-card and other payment information.
The Reader-Side Host Application
The host application resides on a desktop or a terminal such as a PC, an electronic payment terminal, a cellphone, or a security subsystem.
The host application handles communication among the user, the Java Card applet, and the provider's back-end application.
Traditionally, reader-side applications have been written in C. Recent widespread adoption of J2ME technology makes it possible to realize the host application in Java; for instance, it could run on a cellphone that supports MIDP and the Security and Trust Services API.
Smart-card vendors typically provide, not only a development kit, but also APIs to support reader-side applications as well as Java Card applets. Examples include the OpenCard Framework, a Java-based set of APIs that hides some of the details of interacting with card readers from different vendors, and two that I'll discuss later in this article, the Java Card Remote Method Invocation distributed-object model and the Security and Trust Services API (SATSA).
The Card Acceptance Device (CAD) is the interface device that sits between the host application and the Java Card device. A CAD provides power to the card, as well as electrical or RF communication with it. A CAD may be a card reader attached to a desktop computer using a serial port, or it may be integrated into a terminal such as an electronic payment terminal at a restaurant or a gas station. The interface device forwards Application Protocol Data Unit (APDU) commands (discussed later) from the host application to the card, and forwards responses from the card to the host application. Some CADs have a keyboard for PIN entry and may have a display as well.
The Java Card platform is a multiple-application environment. As Figure 4 illustrates, one or more Java Card applets may reside on the card, along with supporting software - the card's operating system and the Java Card Runtime Environment (JCRE). The JCRE consists of the Java Card VM, the Java Card Framework and APIs, and some extension APIs.
All Java Card applets extend the Applet base class and must implement the
install() and process() methods; the JCRE calls install() when installing the applet, and process() every time there is an incoming APDU for the applet.Java Card applets are instantiated when loaded and stay alive when the power is switched off. A card applet behaves as a server and is passive. After a card is powered up, each applet remains inactive until it's selected, at which time initialization may be done. The applet is active only when an APDU has been dispatched to it. How an applet becomes active (selected) is described in the section " Life-Cycle of a Java Card Applet".
You can use either of two models for communication between a host application and a Java Card applet. The first model is the fundamental message-passing model, and the second is based on Java Card Remote Method Invocation (JCRMI), a subset of the J2SE RMI distributed-object model. In addition, SATSA lets you use either message passing or JCRMI to access the smart card through a more abstract API based on the Generic Connection Framework (GCF) API.
The Message-Passing Model
The message-passing model illustrated in Figure 5 is the basis for all Java Card communications. At its center is the Application Protocol Data Unit (APDU), a logical data packet that's exchanged between the CAD and the Java Card Framework. The Java Card Framework receives and forwards to the appropriate applet any incoming command APDU sent by the CAD. The applet processes the command APDU, and returns a response APDU. The APDUs conform to the international standards ISO/IEC 7816-3 and 7816-4.
 |
| Figure 5. Communicating Using the Message-Passing Model (click image to enlarge) |
1. The Command APDUThe structure of a command APDU is controlled by the value of its first byte and in most cases looks like this:
 |
| Figure 6. Command APDU |
- CLA (1 byte): This required field identifies an application-specific class of instructions. Valid CLA values are defined in the ISO 7816-4 specification:
|
- In theory, you can use all
CLAvalues0x80or higher for application-specific instructions, but in many current Java Card implementations only the ones in bold are actually recognized.
INS(1 byte): This required field indicates a specific instruction within the instruction class identified by theCLAfield. The ISO 7816-4 standard specifies the basic instructions to use for access to data on the card when it's structured according to an on-card file system as defined in the standard. Additional functions have been specified elsewhere in the standard, some of which are security functions. See Table 2 for a list of some of the ISO 7816 instructions. You can define your own application-specific INS values only when using an appropriate CLA byte value, according to the standard.
|
P1(1 byte): This required field defines instruction parameter 1. You can use this field to qualify theINSfield, or for input data.
P2(1 byte): This required field defines instruction parameter 2. You can use this field to qualify theINSfield, or for input data.
Lc(1 byte): This optional field is the number of bytes in the data field of the command.
Datafield (variable,Lcnumber of bytes): This optional field holds the command data.
Le(1 byte): This optional field specifies the maximum number of bytes in the data field of the expected response.
T=0:  |
| Figure 7. Four Possible Structures of an APDU Command (click image to enlarge) |
2. The Response APDUThe format of a response APDU is much simpler:
 |
| Figure 8 Response APDU |
Datafield (variable length, determined byLein the command APDU): This optional field contains the data returned by the applet.
SW1(1 byte): This required field is the status word 1.SW2(1 byte): This required field is the status word 2.
 |
| Figure 9. Response Status Codes (click image to enlarge) |
ISO7816 Java interface in the Java Card Framework API defines a number of constants to facilitate the specification of return errors code.3. Processing APDUsEvery time there is an incoming APDU for a selected applet, the JCRE invokes the applet's
process() method, passing the incoming APDU as an argument. The applet must parse the command APDU, process the data, generate a response APDU, and return control to the JCRE.You'll find more information on command and response APDUs in the second part of this article, in the section "The
process() Method - Working with APDUs."The Java Card RMI (JCRMI)
The second communication model relies on a subset of the J2SE RMI distributed-object model.
In the RMI model a server application creates and makes accessible remote objects, and a client application obtains remote references to remote objects, then invokes remote methods on them. In JCRMI, the Java Card applet is the server, and the host application the client.
JCRMI is provided in the extension package
javacardx.rmi by the class RMIService. JCRMI messages are encapsulated within the APDU object passed to the RMIService methods. In other words, JCRMI provides a distributed-object model mechanism on top of the APDU-based messaging model, by which the server and the client communicate, passing method information, arguments, and return values back and forth.The Security and Trust Services API (SATSA)
SATSA, defined in JSR 177, specifies an optional package that provides a security and trust API for J2ME. This client API provides access to services provided by a security element (such as a smart card), including secure storage and retrieval of sensitive information, as well as encryption and authentication services.
SATSA exploits the Generic Connection Framework (GCF) defined in version 1.0 of the Connected, Limited Device Configuration (CLDC) to provide a more abstract interface to the message-passing and JCRMI communication models. To support message passing SATSA defines the
apdu: URL scheme and the APDUConnection, and to support JCRMI it defines the jcrmi: scheme and the JavaCardRMIConnection.SATSA comprises the following packages:
java.rmidefines a subset of the Java 2 Standard Editionjava.rmipackage, specificallyRemoteandRemoteException.
javacard.frameworkdefines the standard Java Card API exceptions that a remote method may throw:CardRuntimeException,ISOException,APDUException,CardException,PINException,SystemException,TransactionException, andUserException.
javacard.framework.servicedefines a standard Java Card API service exception that a remote method may throw:ServiceException.
javacard.security- defines the standard Java Card API encryption-related exception that a remote method may throw:CryptoException.
javax.microedition.iodefines two connection subinterfaces,APDUConnectionfor smart-card access based on the APDU protocol, andJavaCardRMIConnectionfor Java Card RMI protocol.
javax.microedition.jcrmidefines classes and interfaces used by the stubs that the Java Card RMI stub compiler generates.
javax.microedition.pkidefines classes for basic management of user certificates.
javax.microedition.securityservicedefines classes to generate application-level digital signatures.
The Java Card Virtual Machine (JCVM) specification defines a subset of the Java programming language and a Java-compatible VM for smart cards, including binary data representations and file formats, and the JCVM instruction set.
The VM for the Java Card platform is implemented in two parts, with one part external to the card and the other running on the card itself. The on-card Java Card VM interprets bytecode, manages classes and objects, and so on. The external Java VM part is a development tool, typically referred to as the Java Card Converter tool, that loads, verifies, and further prepares the Java classes in a card applet for on-card execution. The output of the converter tool is a Converted Applet (CAP) file, a file that contains all the classes in a Java package in a loadable, executable binary representation. The converter verifies that the classes conform to the Java Card specification.
The JCVM supports only a restricted subset of the Java programming language, yet it preserves many of the familiar features including objects, inheritance, packages, dynamic object creation, virtual methods, interfaces, and exceptions. The JCVM specification drops the support for a number of language elements that would use too much of a smart card's limited memory:
Table 3. Summary of Java Card Language Limitations
|
final.In line with the memory constraint the JCVM specification additionally defines constraints on many program attributes. Table 4 summarizes the JCVM resource constraints. Note that many of these constraints are typically transparent to Java Card developers.
Table 4. Summary of Java Card VM Constraints
|
The Java Card API specification defines a small subset of the traditional Java programming language API - even smaller than that of J2ME's CLDC. There is no support for
Strings, or for multiple threads. There are no wrapper classes like Boolean and Integer, and no Class or System classes.In addition to its small subset of the familiar Java core classes the Java Card Framework defines its own set of core classes specifically to support Java Card applications. These are contained in the following packages:
java.iodefines one exception class, the baseIOExceptionclass, to complete the RMI exception hierarchy. None of the other traditional java.io classes are included.
java.langdefinesObjectandThrowableclasses that lack many of the methods of their J2SE counterparts. It also defines a number of exception classes: theExceptionbase class, various runtime exceptions, andCardException. None of the other traditionaljava.langclasses are included.
java.rmidefines theRemoteinterface and theRemoteExceptionclass. None of the traditionaljava.rmiclasses are included. Support for Remote Method Invocation (RMI) is included to simplify migration to, and integration with, devices that use Java Card technology.
javacard.frameworkdefines the interfaces, classes, and exceptions that compose the core Java Card Framework. It defines important concepts such as the Personal Identification Number (PIN), the Application Protocol Data Unit (APDU), the Java Card applet (Applet), the Java Card System (JCSystem), and a utility class. It also defines variousISO7816constants and various Java Card-specific exceptions. Table 5 summarizes this package's contents:
javacard.framework
|
javacard.framework.servicedefines the interfaces, classes, and exceptions for services. A service processes incoming commands in the form of an APDU. Table 6 summarizes the framework service API:
javacard.framework.service
|
javacard.securitydefines the classes and interfaces for the Java Card security framework. The Java Card specification defines a robust security API that includes various types of private and public keys and algorithms, methods to compute cyclic redundancy checks (CRCs), message digests, and signatures:
javacard.security
|
javacardx.cryptois an extension package that defines the interfaceKeyEncryptionand the classCypher, each in its own package for easier export control. UseKeyEncryptionto decrypt an input key used by encryption algorithms.Cypheris the base abstract class that all ciphers must implement.
javacardx.rmiis an extension package that defines the Java Card RMI classes. It defines two classes,CardRemoteObjectandRMIService.CardRemoteObjectdefines two methods,export()andunexport(), to enable and disable remote access to an object from outside the card.RMIServiceextendsBasicServiceand implementsRemoteServiceto process RMI requests.
The JCRE specification defines the life-cycle of the Java Card VM, the applet life-cycle, how applets are selected and isolated from each other, transactions, and object persistence and sharing. The JCRE provides a platform-independent interface to the services provided by the card's operating system. It consists of the Java Card Virtual Machine, the Java Card API, and any vendor-specific extensions:
 |
| Figure 10. Java Card Architecture and Runtime Environment |
The JCVM's lifetime coincides with that of the card itself: It begins at some time after the card is manufactured and tested, and before it's issued to the cardholder, and it ends when the card is discarded or destroyed. The JCVM does not stop when power to the card is removed, as its state is retained in the card's non-volatile memory. Starting the JCVM initializes the JCRE and creates all the JCRE framework objects, which live for the whole lifetime of the JCVM. After the JCVM has started, all interactions with the card are, in principle, controlled by one of the applets in the card. When power is removed from the card, any data contained in RAM is lost, but any state stored in non-volatile memory is retained. When power is reapplied, the VM becomes active again, at which time the states of the VM and of objects are restored, and execution resumes waiting for further input.
Life-Cycle of a Java Card Applet
Each applet on a card is uniquely identified by an Application ID (AID). An AID, as defined in ISO 7816-5, is a sequence of between 5 and 16 bytes. All applets must extend the
Applet abstract base class, which defines the methods used by the JCRE to control the applet life-cycle as summarized in Figure 10: |
| Figure 11. The Java Card Applet Life-Cycle Methods |
Applet.install() method, and the applet registers itself with the JCRE by invoking Applet.register(). Once the applet is installed and registered, it is in the unselected state, available for selection and APDU processing. Figure 11 summarizes the operation of applet methods. 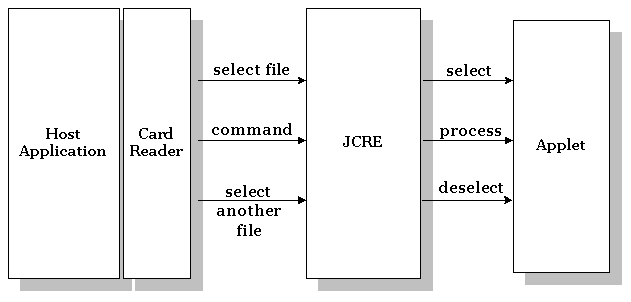 |
| Figure 12. Using The Java Card Applet Methods (click image to enlarge) |
SELECT APDU or MANAGE CHANNEL APDU ). To notify the applet that a host application has selected it, the JCRE calls its select() method; the applet typically performs appropriate initialization in preparation for APDU processing.Once selection is done, the JCRE passes incoming APDU commands to the applet for processing by invoking its
process() method. The JCRE catches any exceptions the applet fails to catch.Applet deselection occurs when the host application tells the JCRE to select another applet. The JCRE notifies the active applet that it has been deselected by calling its
deselect() method, which typically performs any clean-up logic and returns the applet to the inactive, unselected state.The Java Card Sessions and Logical Channels
A card session is the period of time when the card is powered up and exchanging APDUs with the card reader.
Java Card 2.2 supports the concept of logical channels that allow up to 16 application sessions into a smart card to be open at one time, with one session per logical channel. As processing of an APDU in a card can't be interrupted, and each APDU contains a reference to a logical channel (in the
CLA byte), alternating APDUs can access a number of applets in the card pseudo-simultaneously. You can design an applet to be multiselectable; that is, to communicate on more than one logical channel at a time. Multiselectable applets must implement the javacard.framework.MultiSelectable interface and corresponding methods.In some card deployments a default applet can be defined to be automatically selected after card reset, for communication on the base logical channel (channel 0). Java Card 2.2 allows you to define default applets, but doesn't specify how; the mechanism is vendor-specific.
Applet Isolation and Object Sharing
The Java Card platform is a secure multi-application environment - many different applets from different vendors can safely coexist in the same card. Each applet is assigned to an execution context that controls access to the objects assigned to it. The boundary between one execution context and another is often called an applet firewall. It's a Java Card runtime enhancement of the Java security concept of a sandbox, and combines the functionality of the class loader,
java.ClassLoader, and the access controller, java.AccessController. The Java Card firewall creates a virtual heap such that an object can access (public) methods and data of only those objects that are within the same firewall. A firewall may contain a number of applets and other objects, such as common secret keys. A Java Card execution context currently has package scope. When each object is created, it is assigned to the execution context of the caller.The Java Card platform supports secure object sharing across firewalls. Figure 12 depicts applet isolation and object sharing:
 |
| Figure 13. Applet Firewall and Object Sharing |
- Applet a requests access to Applet c's shareable interface by calling the system's
JCSystem.getAppletShareableInterfaceObject()method.
- On behalf of Applet a, the JCRE asks Applet c for its shareable interface by invoking the applet's
getShareableInterfaceObject()method.
- If Applet c allows sharing, Applet a will obtain a reference to Applet c's shared objects. Applet a now has access to Applet c. Applet a will own any objects that it creates, even those defined in Applet c.
Managing Memory and Objects
On a Java Card device, memory is the most valuable resource. In some Java Card implementations a garbage collector may not be available. When an object is created, the object and its contents are preserved in non-volatile memory, making it available across sessions. In some cases application data doesn't need to be persistent - it is temporary or transient. To reduce wear on a smart card's persistent memory and thus maximize its lifetime, as much as possible treat data that is frequently updated as transient.
The Java Card technology does not support the transient keyword. Instead the Java Card API (
javacard.framework.JCSystem) defines three methods that allow you to create transient data at runtime, and a fourth that lets you check whether an object is transient:static byte[] makeTransientByteArray(short length, byte event)static Object makeTransientObjectArray(short length, byte event)static short[] makeTransientShortArray(short length, byte event)static byte isTransient(java.lang.Object theObj)
byte or short primitive data types, or you can create a transient Object. But keep in mind the following behavior for transient data:- The state of a transient object does not persist across sessions. Note that the content (not the object itself) is what is transient. As with any other Java language object, a transient object exists as long as references to it remain.
- The contents of a transient object might get reset to the field's default value (zero,
false, ornull) when an event such as a card reset or applet deselection occurs.
- For security reasons, the fields of a transient object are not stored in persistent memory.
- Updates to the fields of a transient object are not atomic and are not affected by transactions.
install() method, which is invoked only once during the applet lifetime.To promote reuse, objects should remain in scope or referenced for the life of the applet, and their state (values of member variables) reset as appropriate before reuse. Because a garbage collector is not always available, an application may never reclaim the storage allocated to objects that go out of extent.
Persistent Transactions
The JCRE supports atomic transactions for updating one or more persistent objects safely. Transactions ensure data integrity in the event of power loss or program error. Transactions are supported at the system level, by the following methods:
JCSystem.beginTransaction()JCSystem.commitTransaction()JCSystem.abortTransaction()
beginTransaction(), and ends with a call to either commitTransaction() or abortTransaction(). Let's look at a code snippet that uses these APIs: ... private short balance; ... JCSystem.beginTransaction(); balance = (short)(balance + creditAmount); JCSystem.commitTransaction(); ... |
The update of the instance variable balance is guaranteed to be an atomic operation. If a program error or a power reset occurs, the transaction will ensure that the previous value of
balance is restored.The JCRE does not support nested transactions.
The first installment of this article covered a lot of ground: the use of smart cards to store sensitive information and process transactions securely, and the various aspects of Java Card technology - the Java Card VM, the runtime environment, the relevant APIs, and the behavior of Java Card applets. The second part of this article will cover the development aspects of the Java Card technology.
Smart cards with Java Card technology are the most portable and secure way of carrying digital personal information and computational capabilities; a very powerful and needed technology in today's digital world.
- The following references can be found in the Java Card Development Kit (JCDK):
- Java Card 2.2 Application Programming Interface
- Java Card 2.2 Runtime Environment (JCRE) Specification
- Java Card 2.2 Development Kit User's Guide
- Java Card 2.2 Virtual Machine Specification
- Java Card Applet Developer's Guide
- ISO/IEC 7816-4: Identification Cards - Integrated Circuit(s) Cards - Part 4: Interindustry Commands for Interchange
- "Smart Card Developer's Kit" by Scott Guthery and Tim Jurgensen
- Smart Card Basics
- Java Card Technology for Smart Cards: Architecture and Programmer's Guide by Zhiqun Chen
- Radio Frequency ID (RFID) tags, a basic primer
Sunday, January 9, 2011
10th jan-monday
Effects-, fade for image . For that put the <mx:fade id= "fade" duration="5000" /> above an image tag<mx:image>
and in image tag add " : ---> onCreationCompleteEffect="{fade}"

and in image tag add " : ---> onCreationCompleteEffect="{fade}"

Friday, January 7, 2011
Simple mvc-my first mvc code
Model
The model contains the actual data, and for our example it should a class that hold list values. As I pointed out earlier we could use an ArrayCollection to store the list. For this we make an actionscript class named ListModel
The view should display model's changes and for this we mark the model class as [Bindable]. This is nice feature of ActionScript, no such thing in Java Swing.
Now, to add a new item in the list we simply nee an addElement function. In this example we make the model a singleton. This means that if we make more than one list they will share the same data.
01 | package org.bserban.flex.simplemvc.model |
02 | { |
03 | import mx.collections.ArrayCollection; |
04 | /** |
05 | * Model class used to store list data and to |
06 | * provide access to the list content. |
07 | * |
08 | * For demo purposes, we have only addElement. |
09 | */ |
10 | [Bindable] |
11 | public class ListModel |
12 | { |
13 | public var items :ArrayCollection = new ArrayCollection(); |
14 | private static var instance:ListModel; |
15 | public function ListModel(){ |
16 | instance=this; |
17 | } |
18 | /** |
19 | * For this demo we treat this class as singletone. |
20 | * If list is reused the component that reuse it |
21 | * must keep reference to model and controler. |
22 | */ |
23 | public static function getInstance():ListModel{ |
24 | if(instance == null){ |
25 | instance = new ListModel(); |
26 | } |
27 | return instance; |
28 | } |
29 |
30 | /** |
31 | * Add a new element to the list, the model is bindable, |
32 | * no further actions are required, the view |
33 | * is notified automatically. |
34 | */ |
35 | public function addElement(itm:String): void{ |
36 | items.addItem(itm); |
37 | trace(" item added, now we have:"+items.length); |
38 | } |
39 | } |
40 | } |
Controller
The controller is responsible for the interaction between view and model. In our case will make the validation of the text, it doesn't allow the view to add empty text into the list. Let's make a new class named Controller. As an exercise add also a sort function.
The controller holds a reference to the model and provides functions to the view. In a more advanced implementation the Controller would listen for events from the view and the decides what action should do.
01 | package org.bserban.flex.simplemvc.controller |
02 | { |
03 | import org.bserban.flex.simplemvc.model.ListModel |
04 | import mx.utils.StringUtil; |
05 |
06 | public class Controller{ |
07 |
08 | private var model:ListModel = ListModel.getInstance(); |
09 | /** |
10 | * Glue the interaction between view and model. |
11 | */ |
12 | public function Controller(){ |
13 | } |
14 | /*** add a new item into the list model.*/ |
15 | public function addPerson(name:String):void{ |
16 | if(name==null || StringUtil.trim(name).length==0){ |
17 | trace("emptyname"); |
18 | }else{ |
19 | model.addElement(name); |
20 | } |
21 | } |
22 | } |
23 | } |
24 | |
View
The view is the graphical representation of the component. Usually it is a an mxml file but it can be also an actions script file for advanced programmers. It binds his data to the model and use the controller to process the view events. Let's name it SimpleAirMVC.mxml. I added Air to its name because i decided to make an air project in Flex Builder.
01 | <?xml version="1.0" encoding="utf-8"?> |
02 | <mx:WindowedApplication |
03 | xmlns:mx="http://www.adobe.com/2006/mxml" layout="absolute" |
04 | height="226" width="235"> |
05 | <mx:Script> |
06 | <![CDATA[ |
07 | import mx.controls.List; |
08 | import org.bserban.flex.simplemvc.model.ListModel; |
09 | import org.bserban.flex.simplemvc.controller.Controller; |
10 | [Bindable] |
11 | private var model:ListModel = ListModel.getInstance(); |
12 | private function clickHandler():void |
13 | { |
14 | var controler:Controller = new Controller(); |
15 | controler.addPerson(personTxt.text); |
16 | personTxt.text=""; |
17 | } |
18 | ]]> |
19 | </mx:Script> |
20 | <mx:TextInput x="10" y="10" id="personTxt" text="" |
21 | width="145"/> |
22 | <mx:Button x="163" y="10" label="Add" id="btnAdd" |
23 | click="clickHandler()"/> |
24 | <mx:List x="10" y="40" width="218" |
25 | dataProvider="{model.items}"></mx:List> |
26 | </mx:WindowedApplication> |
This is a simple way to implement a MVC in a small application. Things can become more complicated if the application is big. If this is the case then you should look over Pure MVC framework or Cairngorm. They eliminate the dependencies between MVC layer by using events. It is an event driven approach.
You may download the source code here SimpleAirMVC
Subscribe to:
Posts (Atom)